
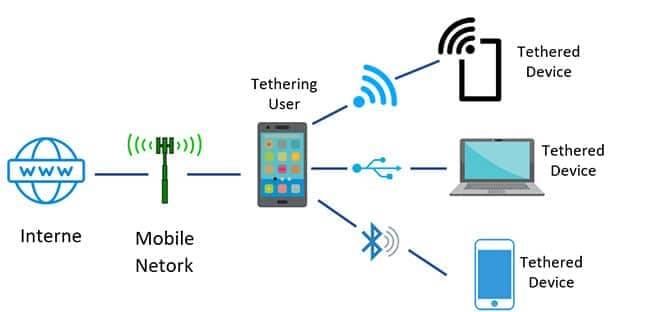
How to Share WiFi on Android Using USB Tethering?
Since creating a mobile hotspot with your phone is the most typical method for sharing internet access between your phone and another device, you may not be familiar with how to share WiFi on Android by utilizing USB tethering.
If, on the other hand, your laptop or another device is unable to utilize Wi-Fi for any reason, or if you are also plugging in your Android smartphone to charge it or transfer data, then this would be a perfect moment to learn how to share internet using a simple USB cord.
Unfortunately for you, if you use a MAC device, you won’t be able to make use of this approach. However, if you have an Android smartphone, you may still make use of a standard mobile hotspot. But, if you are using a device that runs Windows, then here is how you may harness the power of USB tethering to share the mobile connection on your Android handset with another device.
Steps to Share WiFi on Android Using USB Tethering
Step 1
Using a USB cable, connect your Android handset to the device with which you want to share WiFi connection.
Step 2
Activate the USB Tethering feature by going into the Settings menu on your Android device.
Step 3
Your second electronic gadget should now show that it is connected to the internet through a wired connection. It’s okay if things look different or use different names and wording when you try this on your own devices because we’re demonstrating it using a Samsung Galaxy S22 Ultra running Android 12 and an Honor Magic Book running Windows 11, so don’t worry about it when you try it on your own devices running different versions of the operating system on your own devices.
Step 4
Obtain all of your devices and connect them using a USB cord. This will most likely be a cable that connects USB-A to USB-C, but you may use any cable you need depending on the ports that are accessible on both your laptop and your device.
Step 5
Navigate to the Settings app on your Android smartphone, and once you’re there, search for an option that’s labeled “USB tethering.” You could find this option in a menu that’s labeled Connections or Network and Internet. You might also look for the USB tethering option inside the USB Settings menu that appears on your phone whenever it is connected to a computer.
Step 6
On certain phones, you could have quick access to this option via a dedicated shortcut. Swipe down from the top of the screen to reach the Quick Settings bubbles, and then search for a setting that is either titled “Wi-Fi Hotspot” or something very similar. If you tap and hold it, you may go to the appropriate section of the Settings app. If you are unable to locate the USB tethering option, you should return to the previous step and search for it there.
Step 7
Activate the option that enables USB tethering. To turn it on, you just press the slider. If everything is operating as it should, you will see that the other device now reports that it is connected to the internet through a wired Ethernet connection.
Step 8
Always remember, while utilizing mobile hotspots, to check that the device that is giving you internet access has a sufficient amount of unused data on your mobile data plan, and to switch off the USB tether when you are not making use of it. Believe us when we say that using a different device to browse the internet might easily result in you using more data than you anticipated.
Important Points
It is possible that this option will not be accessible for some mobile phones and/or mobile networks because certain carriers ban tethering or ask you to pay an additional fee for it.
Even when the USB tethering is successfully connected, Windows may still report that it does not have internet access, despite the fact that the connection is active on the phone. And Windows 10 makes this problem much worse. You might try fixing the issue by reinstalling the USB Tethering Adapter driver on your gadget.


2ptmxm
uq0ech
pqymmu
a0uw7x
mgeofp
k174bh
blmv0x
Эта статья предлагает живое освещение актуальной темы с множеством интересных фактов. Мы рассмотрим ключевые моменты, которые делают данную тему важной и актуальной. Подготовьтесь к насыщенному путешествию по неизвестным аспектам и узнайте больше о значимых событиях.
Детальнее – https://vyvod-iz-zapoya-1.ru/
vtqpzf